
Recipes
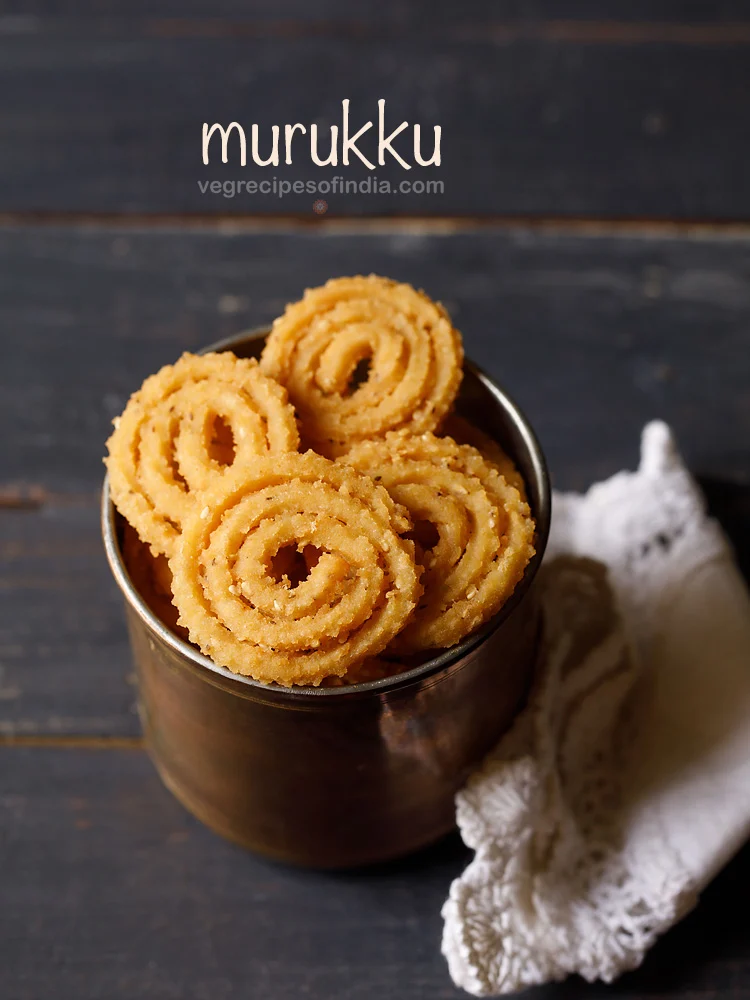
Murukku Recipe
Ingredients
- 3 tablespoons urad dal – 40 grams
- 1 cup Rice Flour – 150 grams
- ¼ teaspoon asafoetida powder (hing) – can also add ⅛ teaspoon asafoetida
- ¼ teaspoon red chilli powder or add as required
- ½ teaspoon salt or add as required
- 1 teaspoon white sesame seeds – can also add black sesame seeds
- ½ teaspoon carom seeds (ajwain) – can also add ½ teaspoon cumin seeds
- 2 tablespoons Ghee – 40 grams
- 10 to 11 tablespoons water or add as required
- oil as required for deep frying
Instructions
Making urad dal flour
-
Heat a small frying pan or kadai. Keep the heat to its lowest and add urad dal.
-
Begin to roast urad dal and keep stirring often when roasting the lentils.
-
Roast urad dal till they become aromatic or are light golden. Do not make them brown.
Remove in a plate and let the roasted urad dal cool at room temperature.
-
Take the roasted urad dal in a small dry grinder jar or a small chutney grinder jar. Grind to a fine flour. Keep aside.
-
Meanwhile, spread oil on the murukku disc. Also spread some oil on the part of the murukku maker where the dough will be placed.
Making murukku dough
-
In a fine sieve, take rice flour. Also add the urad dal flour to the same sieve.
-
Next add red chilli powder, asafoetida powder and salt.
-
Sift the dry ingredients twice.
-
To the sifted flours add sesame seeds, carom seeds and ghee.
-
Mix everything very well. Then with your fingertips mix the ghee in the flour evenly. The mixture should resemble breadcrumbs.
-
Hold a small portion of the murukku mixture in your palms and it should hold itself together.
-
It should not break or fall apart. If it breaks or falls apart, then add 1 to 2 teaspoons more of the ghee. Mix again very well and then check.
-
Now add water in parts and begin to mix and knead.
-
Keep on adding water in parts and knead very well.
-
You will need about 10 to 11 tablespoons of water. The amount of water needed will depend on the quality of rice flour. Check the taste of dough and add more salt if required.
-
Knead to a smooth and soft dough. Also keep the dough slightly moist, but do not make too moist or wet as then the murukku absorbs more oil.
-
Murukku has to be made as soon as you knead the dough, so keep everything ready before you shape and fry them.
Shaping murukku
-
Now divide the dough in two parts and add first part in murukku maker. Cover the second part of dough with a kitchen towel.
-
Before you begin to shape the murukku, keep oil in a kadai (wok) or frying pan to get heated.
Keep the oil on a low or medium-low heat, so that it does not become very hot. Use any neutral flavored oil with a high smoke point.
-
Use butter paper or parchment paper squares. Cut them in squares and keep ready before you make murukku.
-
Press the murukku maker and move in rounds to get the concentric circles or spiral shape on the paper squares.
Break the dough towards the end and press it to the last concentric circle of the spiral.
-
Tip 1 – If the murukku breaks while forming them, this means that the dough does not have enough moisture. Add 1 or 2 tablespoons of water and knead the dough again.
-
Tip 2 – If you are not getting proper shape, this mean that the dough is too moist. Add some rice flour and knead again.
-
Make a batch of murukku. E.g make 3 to 5 murukku that you will be frying at a time.
Frying murukku
-
Next test the hotness of the oil. Add a small piece of the murukku dough in the oil and it should come up gradually.
-
If it comes up fast, the oil is hot, so reduce the heat. If it sticks or is at the bottom or comes up slowly, the oil is not hot enough, so increase the heat.
-
Take the butter paper with the murukku in your hands. Then take a small to medium sized wooden spatula and place it on the murukku gently.
-
Then gently turn over the spatula. The butter paper will be facing you. Lift the butter paper gently.
-
The murukku will be neatly placed on the wooden spatula.
-
Now gently tilt or place the spatula in oil, so that the murukku slides in the oil.
-
Add the remaining murukku also in this manner. Fry on a medium heat.
-
When they turn light golden, then flip them gently. Fry the second side.
-
Fry the murukku till the oil stops sizzling or till they become crisp and golden. Do not brown them too much. Turn over as needed for even frying.
-
Tip 3 – Check the first batch of murukku. If it looks like that the murukku has absorbed oil or breaks in oil, then add some rice flour, about 1 to 2 tablespoons and knead again. This happens if too much fat has gone in the dough.
-
Remove with a slotted spoon draining extra oil in the kadai or pan itself.
-
Place them on kitchen paper towels to soak extra oil.
-
Once they cool at room temperature, then store murukku in an air-tight box at room temperature.
-
Serve Murukku as a tea-time snack.
Ingredients
For cooking rice
- 1 cup basmati rice or long grained rice – 190 to 200 grams
- 4 to 4.5 cups water
- ½ teaspoon salt or add as required
- 2 to 3 drops toasted sesame oil or any neutral oil
Other ingredients
- 3 tablespoons oil – any neutral flavored oil
- 1 star anise
- ¾ to 1 teaspoon finely chopped garlic or 3 to 4 small to medium garlic cloves
- ½ teaspoon finely chopped ginger or ½ inch ginger – optional
- ¼ cup chopped spring onion whites (scallions)
- ¼ cup finely chopped french beans
- ¼ cup finely chopped carrots
- ¼ to ½ cup finely chopped cabbage – optional
- ¼ cup chopped bell pepper or capsicum – red, green or yellow
- 1 cup chopped button mushrooms
- 1 tablespoon finely chopped celery – skip if you do not have
- 3 tablespoons soy sauce (naturally brewed) or tamari – can add as required
- 1 teaspoon rice wine or rice vinegar
- ½ teaspoon black pepper powder or add as required
- 2 tablespoons chopped spring onions greens
- salt as required
Instructions
Cooking rice
-
Rinse rice very well till the water runs clear of starch. Soak rice in water for 30 mins. Drain and keep aside.
-
In a pot, bring water to a gentle boil with salt and 2 to 3 drops of toasted sesame oil.
-
Add the soaked and drained rice to the hot water.
-
On a low to medium to medium-high heat simmer rice without the lid.
-
When rice becomes al dente or just about cooked, remove the pot from the heat. Strain the rice in a colander or sieve.
-
You can also gently rinse cooked rice in water so that they stop cooking and don’t stick to each other. Cover the cooked rice and set aside until the rice cools completely. You can even refrigerate rice with a covered lid for 30 minutes.
Chopping veggies
-
When the cooked rice is cooling, chop the veggies finely and keep aside.
-
Remember to chop the french beans very finely. They take more time to cook than other veggies. You can also blanch them first and then cook. Another option is to add the beans first and then add the other vegetables.
Making fried rice
-
Heat oil in a wok or a pan. First add the star anise and fry for a few seconds or until the oil becomes fragrant.
-
Add the garlic, ginger and sauté for some seconds. No need to brown the garlic.
-
Add the spring onions whites and sauté for about 2 minutes.
-
Then add finely chopped french beans.
-
Stir fry french beans for 2 to 3 minutes over medium to medium-high heat.
-
Add the remaining finely chopped veggies, including mushrooms and celery. Increase the heat to a high to thoroughly cook all of the vegetables.
-
You have to continuously toss and stir while frying so that the veggies are uniformly cooked and do not get burnt.
-
The vegetables have to be stir-fried, until they are almost cooked and yet retain their crunchiness and crispiness. Stir-frying vegetables on high heat takes about 4 to 6 minutes.
-
Add the soy sauce, salt and pepper. Stir quickly and add cooked and cooled rice. Stir fry for a few minutes until the sauce has coated the rice well. Keep a check when adding salt, as soy sauce already has salt in it.
-
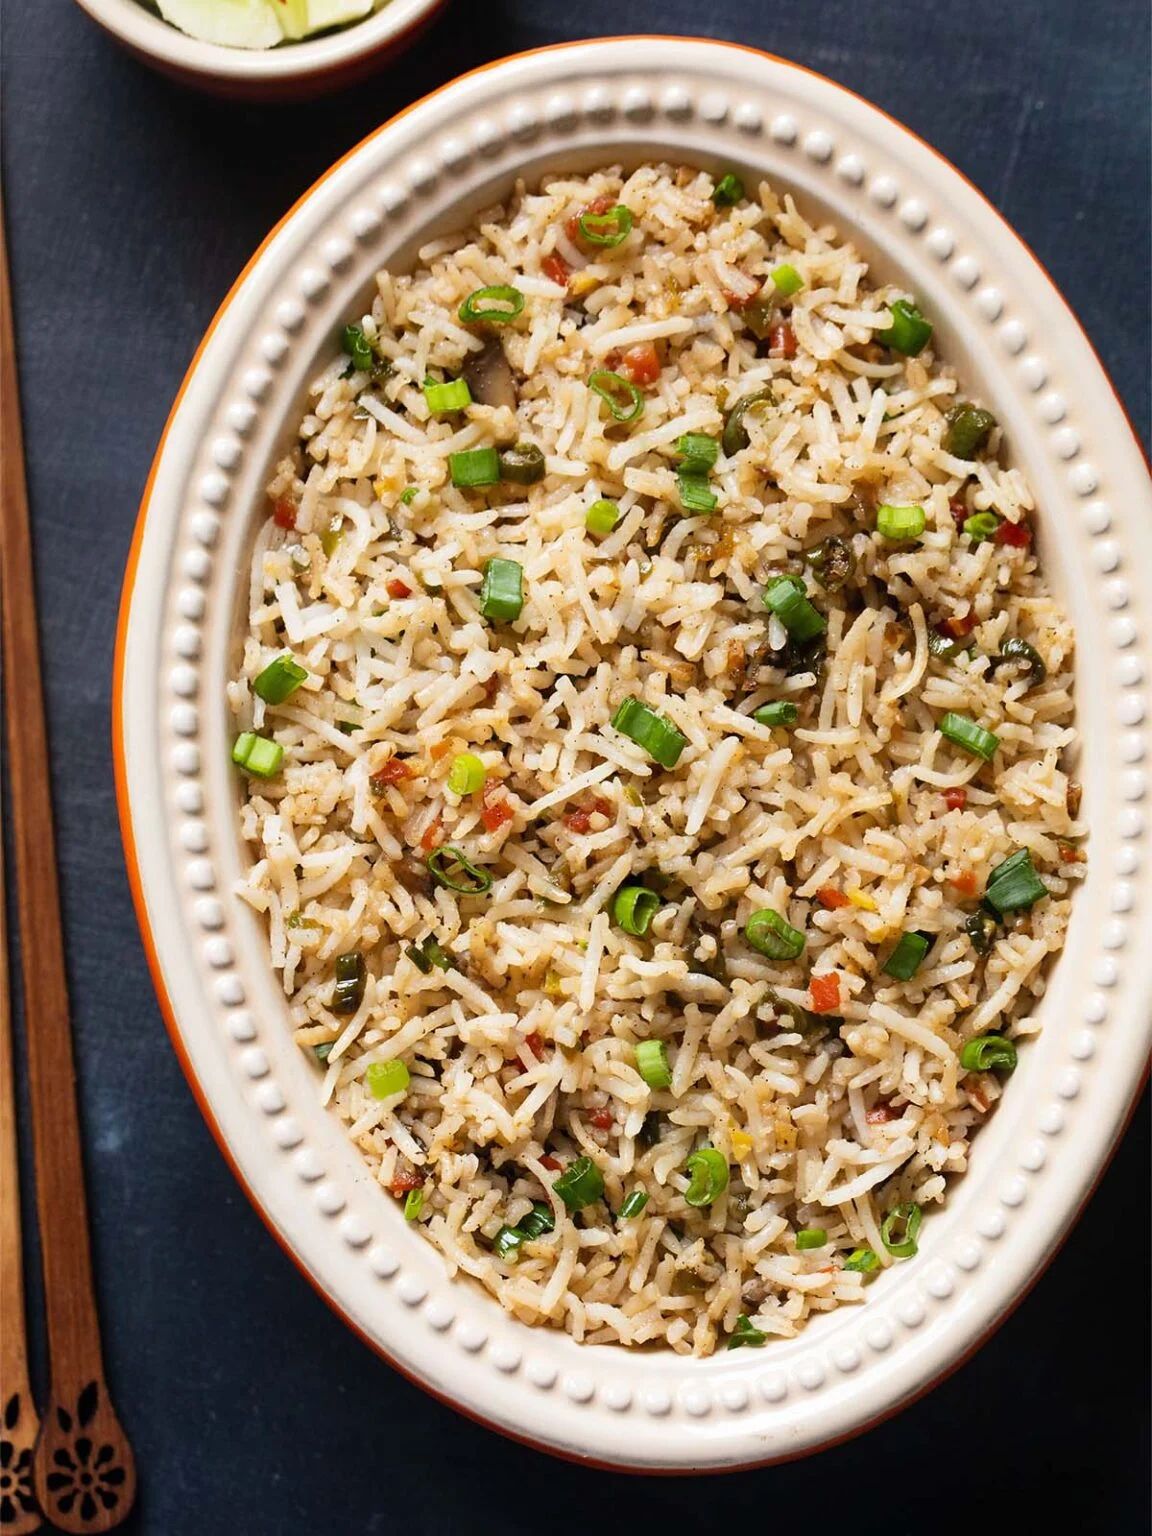
Serve the fried rice hot as it is or with with your favorite Chinese side.
Serving suggestions
-
Though fried rice tastes great on its own, you can pair it with Veg Manchurian, Gobi Manchurian, Chilli Paneer, Spring Rolls or Chilli Mushroom. More side recipes for veg fried rice are linked and listed in the main post.
Storing fried rice
-
Vegetable fried rice stays good for a couple of a days. But I would recommend it to be eaten as soon as you can since many days old rice is not good for health.
Ingredients
For the paste
- ⅓ cup chopped onions or 1 medium-sized onion
- ¼ cup cashews – whole cashews
- 1 teaspoon cumin seeds
- 1 teaspoon chopped garlic or 4 to 5 medium-sized garlic cloves
- 1 teaspoon chopped ginger or 1 inch ginger
- 1 teaspoon chopped green chilies or serrano peppers or 1 to 2 green chilies
Other ingredients
- 2 tablespoons oil or ghee
- 1 cup chopped fenugreek leaves (methi leaves)
- ½ cup water or the stock/water of boiled green peas – add as required
- ½ cup green peas – boiled or steamed
- ½ cup light cream or low-fat cream, check notes below for whipping or heavy cream
- ½ teaspoon sugar or add as required
- salt as required
For garnish
- 1 to 2 tablespoons chopped coriander leaves (cilantro)
- 1 to 2 tablespoons green peas boiled or steamed – optional
Instructions
Preparing the ground paste
-
In a grinder jar or blender, add cumin seeds, chopped onions, cashews, garlic, ginger and green chilies.
-
Blend or grind to a smooth paste withput adding any water.
-
If you are not able to blend, then you can add 1 to 2 tablespoons of water.
-
For cooking the green peas, you can either boil them in a pan with 1.5 cups water for 7 to 8 minutes until tender or steam them in an Instant pot for 3 to 5 minutes adding about 1 to 1.25 cups water in the steel insert.
-
You can also boil the green peas in a stove-top pressure cooker for 5 to 6 minutes. Reserve ½ cup of the cooked water if you have boiled the peas.
Sautéing ground paste
-
Heat ghee (clarified butter) or oil in a pan or kadai.
-
When the ghee melts or becomes lightly hot, add the ground paste.
-
Sauté the paste for 6 to 7 minutes on a low heat until you see the fat separating from the sides.
-
Stir often when sautéing so that the paste does not stick to the pan. You should see fat releasing from the sides and the paste will also have a nice aroma.
-
You will see the paste coming together and becoming glossy. Do not brown the paste.
-
If the ground paste sticks to the pan or gets browned add a few splashes of water. Mix, deglaze and continue to sauté.
Making methi matar malai
-
Add in the chopped fenugreek leaves and sauté further for 2 to 3 minutes.
-
Then add ½ cup water or the stock/water in which the green peas were cooked in two parts. Mix thoroughly and simmer the gravy for 3 to 4 minutes. Stir at intervals.
-
Add the boiled peas and cream.
-
Simmer the gravy for 5 to 6 minutes on a low heat.
-
Finally add the sugar and salt. Mix again. At this step, you can opt to sprinkle 2 to 3 pinches of garam masala powder.
-
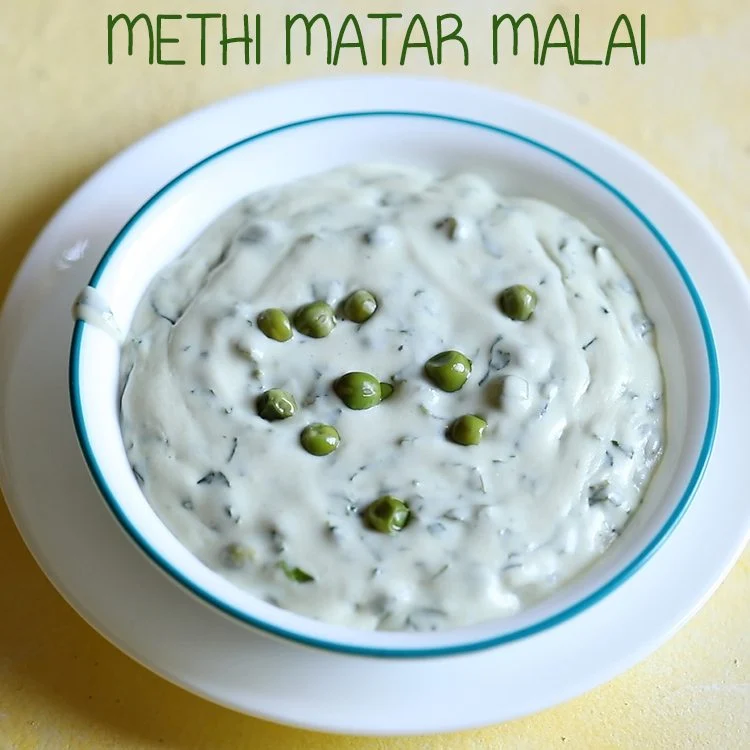
Garnish with coriander leaves and serve methi matar malai hot or warm with naan, paratha or roti.
Ingredients
For frying & roasting
- 2 tablespoons Ghee (clarified butter)
- 14 halved cashews
- ½ teaspoon mustard seeds
- 1 teaspoon chana dal (husked and split bengal gram or split & husked chickpeas)
- ½ teaspoon cumin seeds
- 10 curry leaves – chopped
- 1 pinch asafoetida – optional
- 1 teaspoon or 1 inch finely chopped ginger
- 1 green chilli – finely chopped
For batter
- 2 tablespoons finely grated carrots – optional
- 2 tablespoons chopped coriander leaves (cilantro)
- ½ teaspoon salt or add as required
- 1 cup or 175 grams cup rava (sooji, semolina, cream of wheat)
- ½ cup Curd (yogurt)
- ½ to ¾ cup water or add as required
- 1 teaspoon eno (fruit salt) or ¼ teaspoon or 2 to 3 pinches of baking soda
Instructions
Frying & Roasting
-
Heat 2 tablespoons ghee in a pan. Keep the heat to low or medium-low. Add the halved cashews. Stirring often fry the cashews till golden. Remove fried cashews with a slotted spoon draining the ghee and keep aside.
-
To the same pan add mustard seeds and let them begin to splutter. Keep the heat to low or medium-low
-
When the mustard seeds begin to splutter add the chana dal. Stirring often fry chana dal till they look golden and crunchy. Then add the cumin seeds and fry for 4 to 5 seconds.
-
Now add the chopped curry leaves, asafoetida, finely chopped ginger and green chillies. Mix well and fry for 10 seconds. Keep the heat to a low.
-
Next add rava (cream of wheat, suji, semolina).
-
Mix well and stirring often roast the rava till they become aromatic, change color a bit (but should not get browned or golden) and the grains look separate. Roasting rava will takes about 5 to 7 minutes depending on the thickness and heaviness of the pan, and the flame intensity. Once the rava is well roasted, keep the pan aside. Let the rava become warm.
Making Batter
-
To the roasted rava, add 2 tablespoons finely grated carrots, 2 tablespoons chopped coriander leaves and ½ teaspoon salt or add as required.
-
Next add curd (yogurt) and water as required. Depending on the quality of rava and the thickness of curd, you can adjust the water from ½ to ¾ cup. If the curd is liquid and has whey in it, then add ½ cup water. If the curd is very thick, then add ¾ cup water. Basically you need to get a medium consistency batter.
-
Mix very well and let the batter rest covered for 20 minutes. The rava idli batter is neither thick nor thin in consistency and has a medium consistency.
-
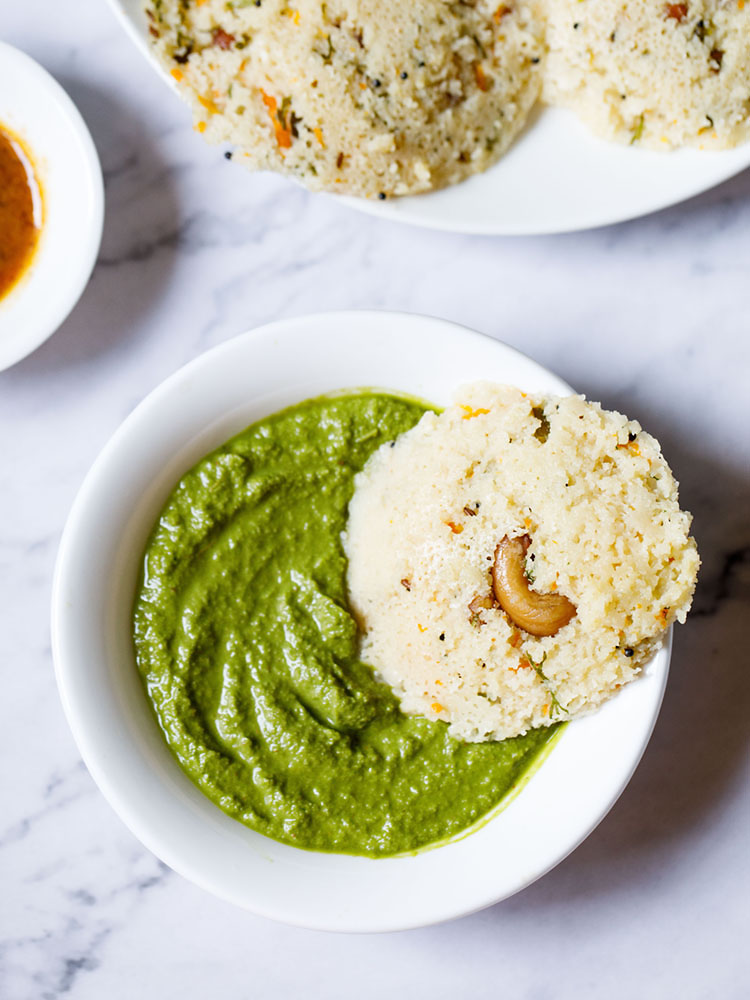
Brush oil or ghee on the idli pan moulds. Place a fried halved cashew in the center of the moulds. Also heat 2 to 2.5 cups water in a pot. Keep a small length trivet stand or a rack in the pot. Heat the water till it comes to a boil.
-
After 20 minutes this is the consistency of the batter after resting. If in case the batter looks thick, rava idli batter looks thick, then add 1 to 2 tablespoons of water to get a medium consistency. Rava absorbs water and so the batter might thicken after 20 minutes. If the curd is thick, then also you may need to add more water. If you have added more water in the beginning, then you may not need to any water at this step.
-
Sprinkle 1 teaspoon eno or ¼ teaspoon baking soda evenly over the batter. Quickly mix very well.
Steaming
-
Pour the batter in the idli moulds. Place them in the pot with the hot water. Cover with a lid and steam rava idli for 10 to 12 minutes.
-
To check the doneness, a toothpick or wooden skewer inserted in the rava idli should come out clean. Remove the idli plates carefully and let them rest for 3 to 4 minutes. Then with a spoon remove the rava idli.
-
Serve the steaming hot rava idli with sambar and your favorite coconut chutney.


MELBOURNE: Fourth India-Australia 2+2 Secretary-level Consultations

TORONTO: India’s response to diplomatic communication from Canada

NGERULMUD: Shri Harsh Kumar Jain concurrently accredited as the next Ambassador of India to the Republic of Palau

STOCKHOLM: Dr. Neena Malhotra appointed as the next Ambassador of India to the Kingdom of Sweden
2020 will be remembered as time of the pandemic. The fallout will be felt for years

KINGSTON: Shri Subhash Prasad Gupta concurrently accredited as the next High Commissioner of India to St.Vincent and the Grenadines
-
 Diplomatic News2 years ago
STOCKHOLM: Dr. Neena Malhotra appointed as the next Ambassador of India to the Kingdom of Sweden
-
Opinions5 years ago
2020 will be remembered as time of the pandemic. The fallout will be felt for years
-
 Diplomatic News2 years ago
KINGSTON: Shri Subhash Prasad Gupta concurrently accredited as the next High Commissioner of India to St.Vincent and the Grenadines
-

 Politcs2 years ago
LONDON: Indian-Origin Candidate On How He Plans To Win London Mayoral Polls
-

 Technology2 years ago
MARYLAND: All About Pavan Davuluri, New Head Of Microsoft Windows
-

 Sports2 years ago
DODOMA: Milind Soman At “Friendship” Marathon Organised By India, Tanzania
-

 Business2 years ago
LONDON: UK Court Allows Sale Of Nirav Modi’s Luxury London Apartment
-

 Politcs2 years ago
LONDON: Run For Modi” Event In London To Drum Up Support For PM Modi